Introduction
When one first approaches the world of computers, their first interaction is with some kind of graphical user interface, commonly termed as a "GUI." This interface is what is termed as a "Desktop Environment" or "DE" for short. A common Desktop Environent's primary form of interaction is based around the utilization of the computer mouse, although, to varying degrees, can be modified to be more oriented towards a keyboard-based interface.
Less familiar to the general public is a piece of software known as the Tiling Window Manager, a much more basic, but possibly more efficient, GUI that is heavily based on the utilization of keyboard interactions from the user. Indeed, much like the Vim Text Editor, a Tiling Window Manager so heavily discourages the use of Mouse Interactions, that an uninitiated user can find themselves presented with an environment where attempts at using the computer mouse results in no feedback at all (i.e., clicking the mouse does nothing by default). At first glance this may seem as a negative, but with the incorporation of more and more keyboard-encouraged interactions with your various pieces of software, one finds that their efficiency utilizing their computer increases, and perhaps also their productivity.
What's A Desktop Environment?
Prior to the advent of computer screens, all visual output from the computer was generally reserved to reading out lengthy printed pages via a line printer, while computer screens were reserved for keeping track of the status of the programs themselves.
The average modern desktop or laptop computer user finds themselves interacting with their Operating System via a Desktop Environment, clicking on icons via their mouse, scrolling articles in the Google Chrome Browser, perhaps typing a bit here and there when they have to perform a search query, or perhaps even typing a decent amount when they have to write an extensive document of some kind.
The ability to type fast, maneuver between applications, context switch between different applications, and perhaps most importantly, the ability to make concise logical decisions, all play a role in how quickly a project is completed. Due to the vast amount of tools we have as modern computer users, and the multitude of ways of thinking and approaching a given task, there is, to put it simply, rarely a "one size fits all" workflow.
The modern Desktop Environment found on Microsoft Windows is the most popular interface with which the average desktop computer user interacts. This is due mainly to the fact that they (the users) are unaware that there are alternatives (or that these alternatives are worth investigating). Even beginner programmers rarely take the time to investigate alternative Desktop Environments, limiting themselves to either working on Windows or MacOs and accepting the default keybindings and workflow instilled in them by the designers and developers of that Desktop Environment. They may investigate what kind of text editors are available to them, although this also is becoming increasingly rare as the majority of beginner programmers reach for VS Code and don't look into what alternatives are out there. This is somewhat unfortunate, as by taking the time to investigate these alternative tools, you may very well find more optimal solutions that better coordinate with your particular workflow. This article is to give you a brief introduction to how the Tiling Window Manager can play into a keyboard-centric workflow.
The Keyboard-Centric Workflow
There have been few articles written on the keyboard-centric workflow. The subject is the realm mainly focused on by productivity enthusiasts and computer programmers (perhaps also the occasional stenographer). I have touched briefly on the concepts of the keyboard-centric workflow in my article on The Vim Text Editor, but will spend more time elaborating on the subject here.
I have always enjoyed the sensation of typing from an early age when I first sat down at a keyboard. In high school and especially college, I took the time to learn some of the classic keyboard shortcuts present in nearly every application. The knowledge of these shortcuts allowed me to navigate more quickly throughout applications, edit text more quickly, and generally work with the computer much faster than others. In short, I became what is known colloquially as a "power user".
It is intriguing to me, having now used Linux for a little over two years, to come to understand that the subject of keyboard shortcuts, or "keybindings," is a point of divergence within the varying philosophies amongst the developers of the major Operating Systems and their Desktop Environment Designs. Within Microsoft Windows and MacOs, one is heavily restricted to utilizing their specific keybindings. The standardization of keybindings, I'll admit, is somewhat essential so that when a user sits down at a colleague's computer, they are not completely lost as to which keys do what, as they are the same across all machines. Unix-like Operating Systems and their many Desktop Environments operate on the general philosophy that user freedom, and by proxy, customization options, is paramount. Thusly anyone operating a Linux or BSD based Operating System today is capable of setting up their own custom keybindings to their liking on their personal machines. This does make working from machine to machine difficult in terms of cohesion when working on a team, but by the same token, this freedom allows for a customizable work environment that is specific to its user. It is in my opinion that this is preferable as it allows the user the freedom to customize their Desktop Environment to their unique and particular workflow, which should, in theory, mesh well with their own personal thought process and problem solving techniques.
Obviously, my preferences in Desktop Environment Design are geared towards creating a personalized keyboard-centric workflow that is unique to the regular user of that particular machine. The remainder of this article will focus on transitioning from a mouse-centric orientation with your computer towards a more keyboard-centric one, with the end goal of installing a Tiling Window Manager on Linux and introducing the basics of utilizing it.
On The Linux Desktop
As you may have already ascertained if you have read my Why Use Linux article, Linux allows for a great deal of user freedom and choice. Linux Desktop Environments are no different. There are a wide variety of options for Desktop Environments, each with their own features, advantages, and disadvantages. I must confess I only have extensive experience in one of the Linux Desktop Environments, that being the XFCE desktop environment. If you are curious, the other popular Linux Desktop Environments currently include GNOME, KDE, Cinammon, and the LXQT Desktop environments. I cannot speak to the quality of these Desktop Environments, but would assume they have a similar (if not more) amount of customization options to the XFCE Desktop Environment.
Customized Keybindings
Most Desktop Environments on Linux have a GUI interface for changing the default keybindings, and I would encourage you to look into your particular Desktop Environment's interface for doing so. The Desktop Environment I utilized when I first started using Linux was XFCE, afterwards I then utilized the i3 Tiling Window Manager (and then the bspwm Tiling Window Manager, which is what I use currently). I will first go into how to adjust the keybindings in XFCE both via XFCE's native GUI application. After that, I will then go into how to utilize the i3 Tiling Window Manager, which is considered by many as a good introduction to Tiling Window Managers.
Firstly, let's start by configuring the keybindings in the XFCE Desktop Environment. Here we see the base install of Debian Linux with the default XFCE Desktop Environment installed: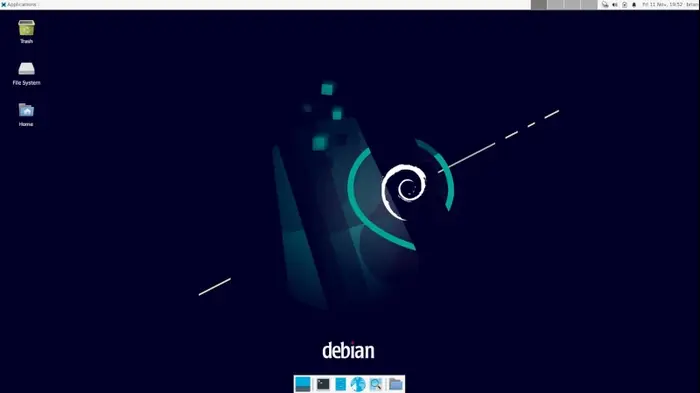
The default terminal emulator in the XFCE Desktop Environment is called xfce4-terminal, thusly if we invoke it from the command line, another terminal emulator should spawn: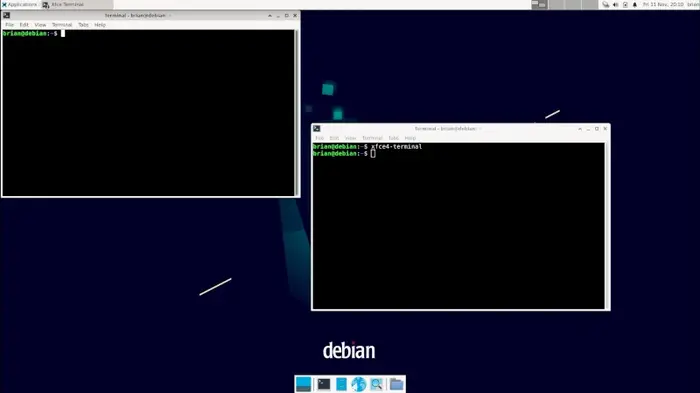
And indeed it does. So now we know we can call xfce4-terminal by typing out that exact name into the command line, but what if I want to call it using a custom keybinding?
In XFCE's version of the start menu (located on the upper left hand side), you will find a menu item called "settings", where you will find the "keyboard" option. This is one of two GUI menus that allow for the modification of keybindings. Click on that so we can get started with one of the first recommended keybindings, that being of "super+enter", which we will bind to open our terminal emulator.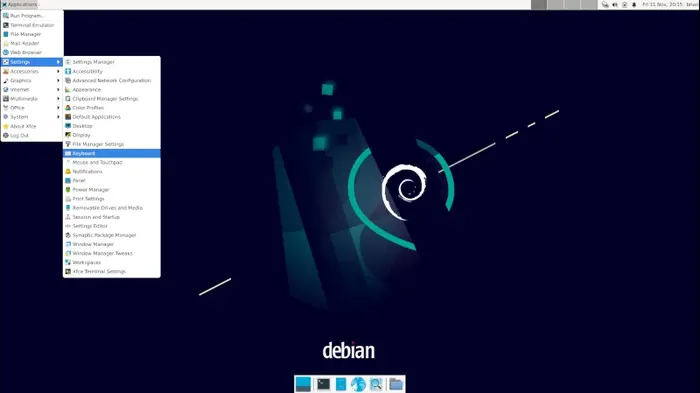
Once opened, Navigate to the Application Shortcuts sub-menu which should present to you some previously configured keybindings that are present by default. We are going to leave those alone and set up our own custom one by clicking on the "Add" button on the bottom left hand side of the menu. You will be presented with an empty input prompt asking for the command you will wish to invoke with this new keyboard shortcut. We want to open our terminal so let's enter the command 'xfce4-terminal':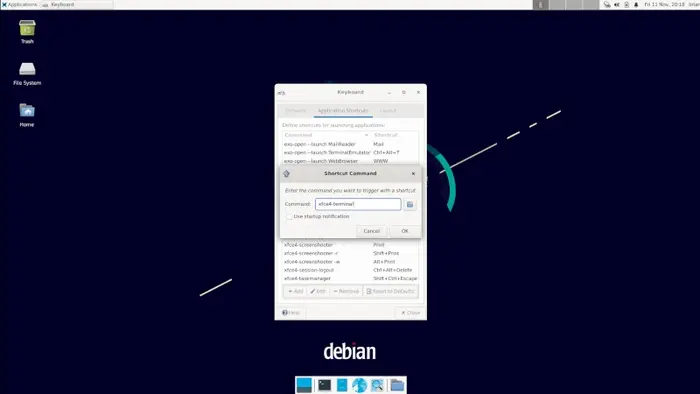
After hitting the "OK" button, we will be presented with a menu that asks us to "Press any Key". Most keyboard shortcuts invoked utilize at least two buttons so as to not accidentally invoke commands whenever typing, so let's choose a classic keybinding "super+enter". To the uninitiated the "super" key is the "windows" key in Microsoft Windows or the "options" key in MacOs. Once entered, the window prompt will disappear and you may notice the new keyboard command show up on the Application Shortcuts menu.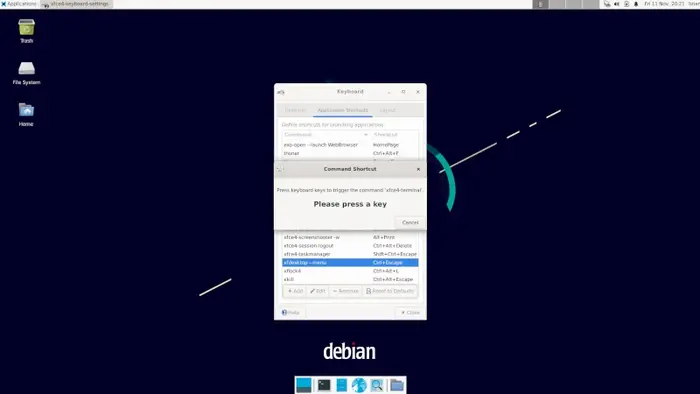
Let's test it out. go ahead and enter "super + enter":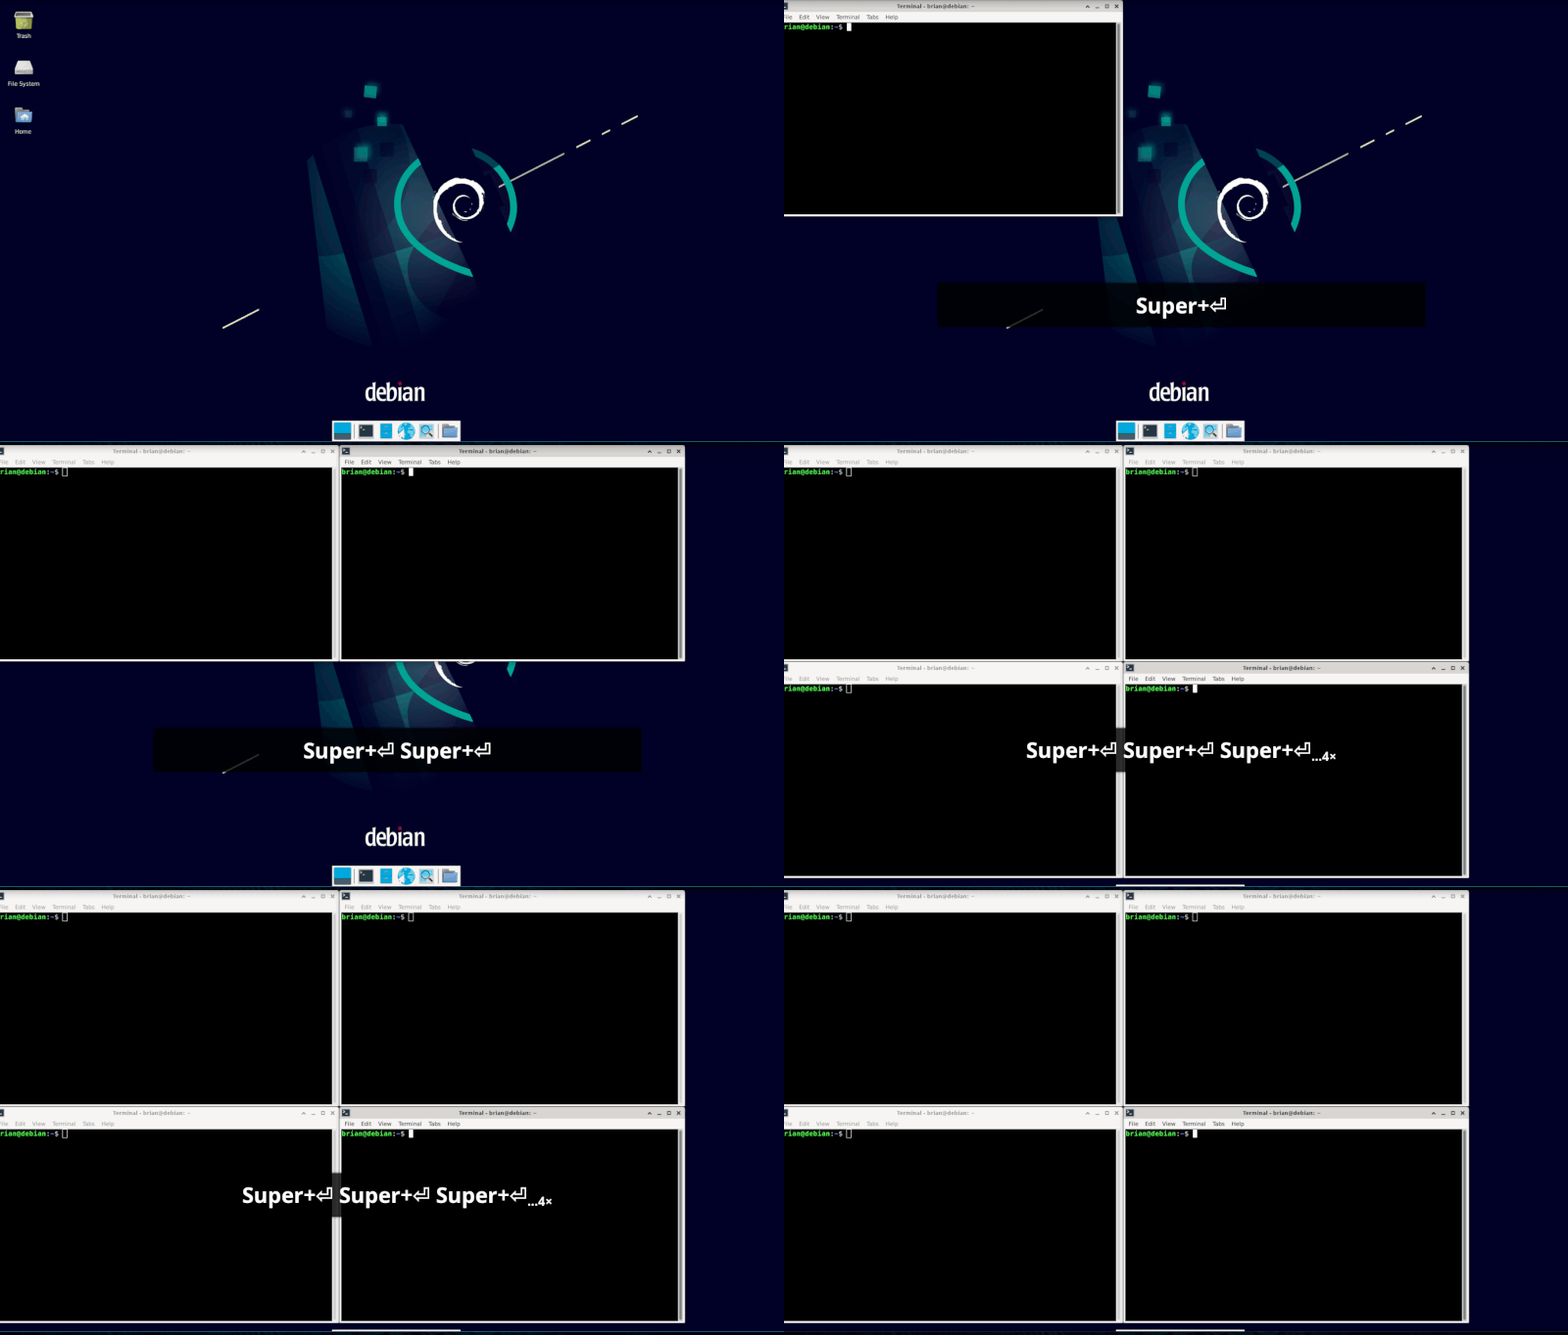
And indeed, we have created a useful keybinding that calls one of our most used applications. You can chain various keys to open applications, but usually the alt, ctrl, or super keys are utilized first. You can call any application that you can invoke on the terminal in this fashion, and usually these are GUI applications, like your browser, your file manager, your music player, etc.
I will now move onto our next subject, which covers the useful feature of Workspaces. The use of Workspaces is more important than Application-related keyboard shortcuts as they essentially maximize the use of space on your screen, allowing you to bring up an entirely new work area for you to fill with your various applications. Instead of moving application windows around and minimizing them when not in use, Workspaces allow you to simply keep those applications open at whatever screen size you like, hiding them from view temporarily, while you navigate to another workspace to do some other sort of work, and then navigate back to your previous workspace to utilize the applications you had been using earlier. The below gif demonstrates the use of Workspaces, which are changed using keybindings.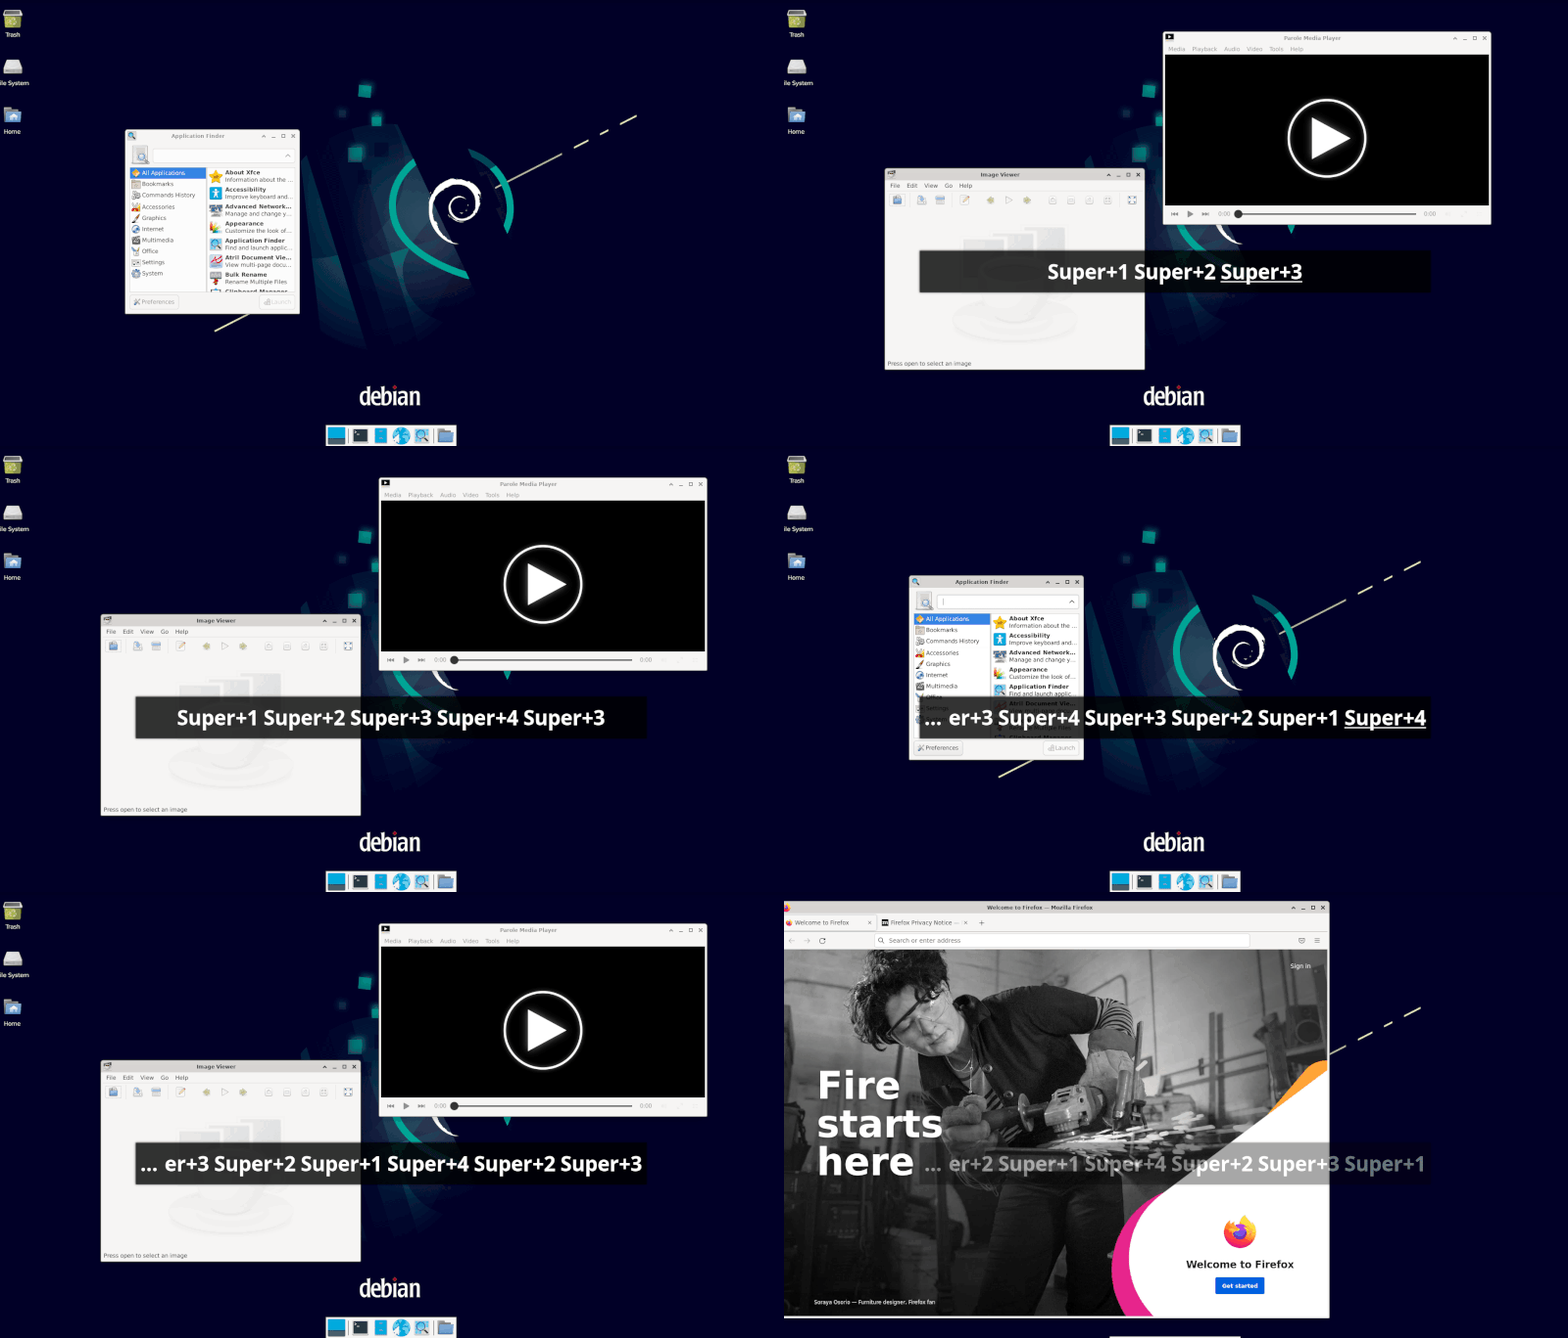
As you can see, each time I enter the super key followed by a number, it brings me to that numbered workspace. The change of the various applications is the change of the workspace, each one having different applications open. There are usually 10 workspaces available (numbered 1-10) in tiling window managers. XFCE allows for 12 (using by default ctrl + F1-F12 keys). In case you were wondering if I modified the keys for these, I did. That is because the super+number keybinding is more traditional in tiling window managers for switching workspces. In XFCE, if you wish to change the workspace keybindings, navigate from the start menu to the settings > window manager sub-menu and select keyboard. You should then edit the keybindings labeled "Workspace" followed by the workspace number. This is basically the same process as editing keybindings for applications.
I could continue to explore the XFCE interface, but let us now move onto the subject of Tiling Window Managers with the introduction of the i3 window manager.
The i3 Window Manager
The installation of the i3 Tiling Window Manager is relatively straight forward, as it simply involves utilizing your native package manager to do so. It is highly likely that if you wish to install a tiling window manager for the first time, that you'd like to keep your current Desktop Environment in the event that you don't like using a Tiling Window Manager. This is completely understandable, and thus our tutorial here will cover how to install i3 alongside XFCE so that you can simply choose one or the other at login.
Let's get started with first installing the needed pieces of software. From your terminal emulator , install the i3 window manager, the i3status display bar, the picom compositor, and the dynamic menu, dmenu, and also the feh image viewer, for setting our background wallpaper.
On Arch Linux:
#bash shell
[~]$ sudo pacman -S i3 i3status picom dmenu feh
On Debian Linux:
#bash shell
[~]$ sudo apt-get install i3 i3status picom dmenu feh
Now we can simply reboot our machine, upon login, before entering your name and password, be sure to select i3 from the wrench icon available at the top right hand corner of our login screen: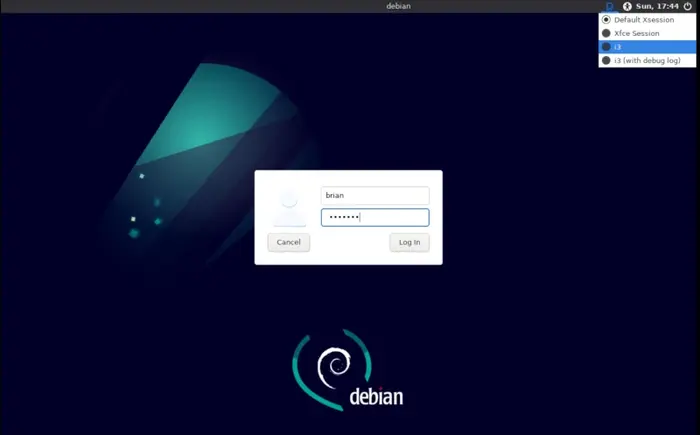
Immediately you will be presented with a far more minimal set up than XFCE. You will be prompted if you'd like to generate a default configuration for i3, go ahead and choose "Yes" and hit enter.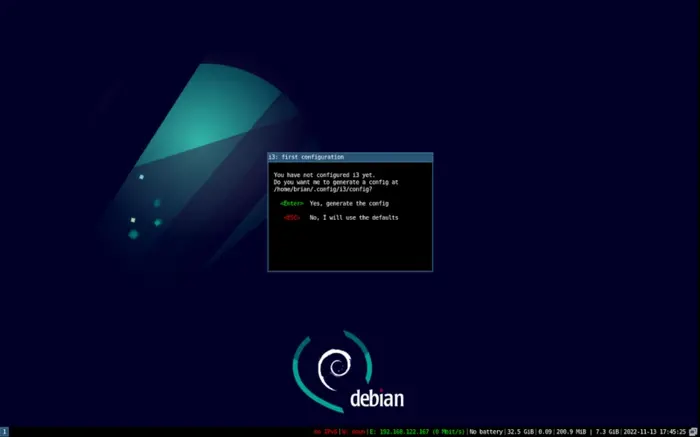
Afterwards which you will be asked which "Mod" key you'd like as default, either the "super" or "alt" key. This key will be the default for chaining with other keys which when used in sequence will call various applications and change workspaces. I personally prefer the "super" key, so I'm going to choose the first option.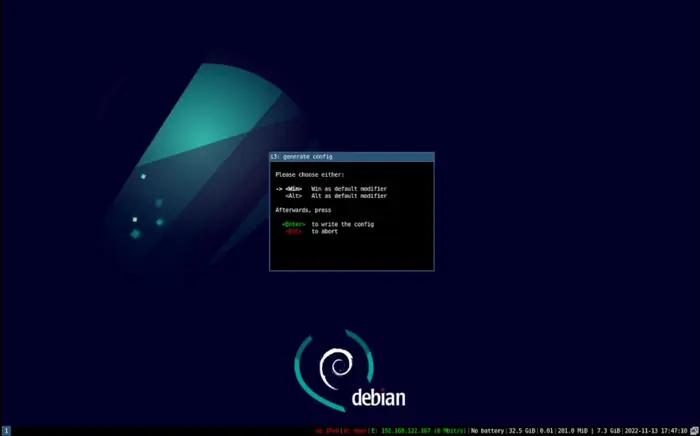
After this choice is made and you hit enter, you'll be left with no further instruction, which can be jarring for beginners. Don't worry, remember the keybinding to call the terminal we made in XFCE? Well the reason I chose "super + enter," was because that is the same command in the default i3 configuration for calling the terminal. So you can do the same here in i3, calling the terminal with "super + enter". In fact, let's call a few terminals to see the default tiling behavior of i3, hit "super + enter" a couple of times: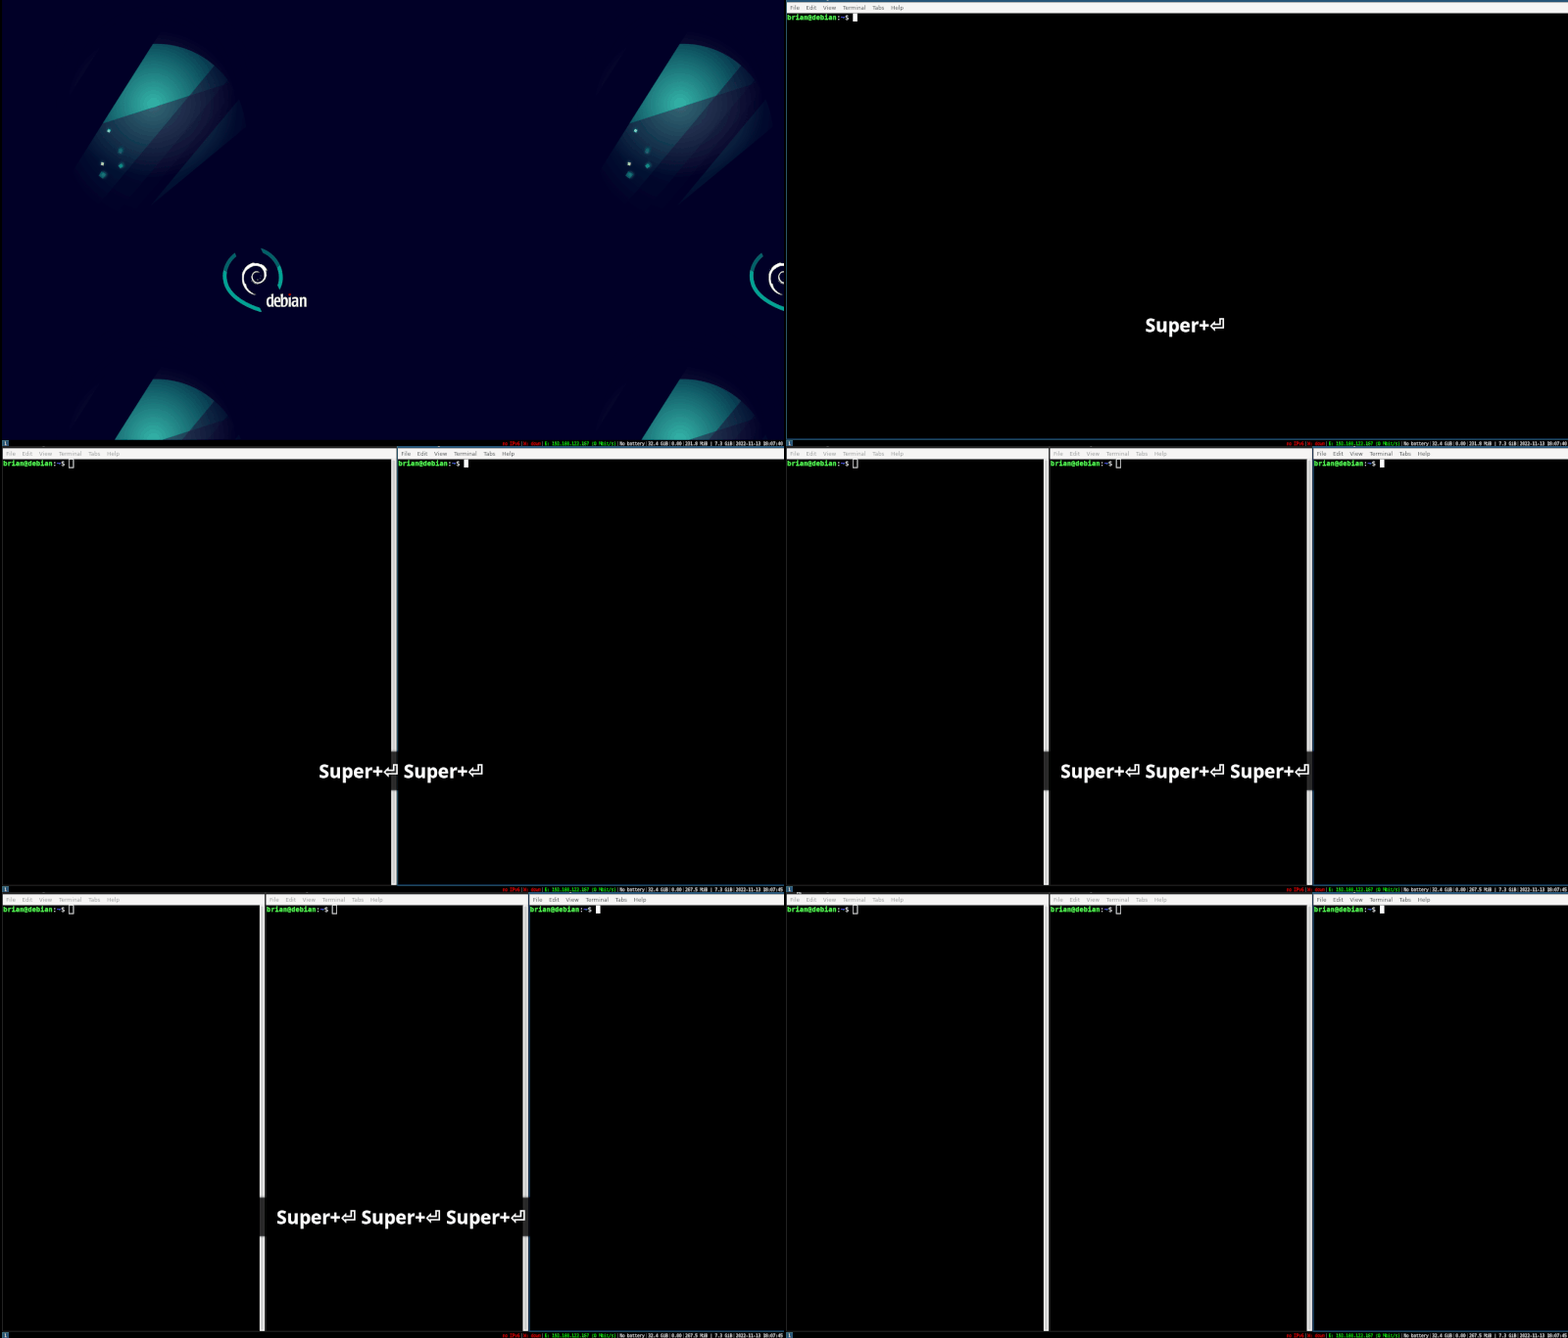
As you can see, a Tiling Window Manager "tiles" its windows in a cascading fashion, utilizing as much of the available screen space (known in some circles as screen "real estate"). So how do we navigate this? Well you can indeed use the mouse to select which of your open applications you'd like to utilize, but obvioiusly, this article being about the keyboard-centric workflow, we'll choose to navigate using our keyboard. Hiting "super+j" or "super+;"(super + semicolon) will navgate left and right respectively. Additionally, if we move a window to the bottom so that it is in a horizontal orientation using (super+shift+k), then we can demonstrate navigation up and down windows using (super+k) or (super+l)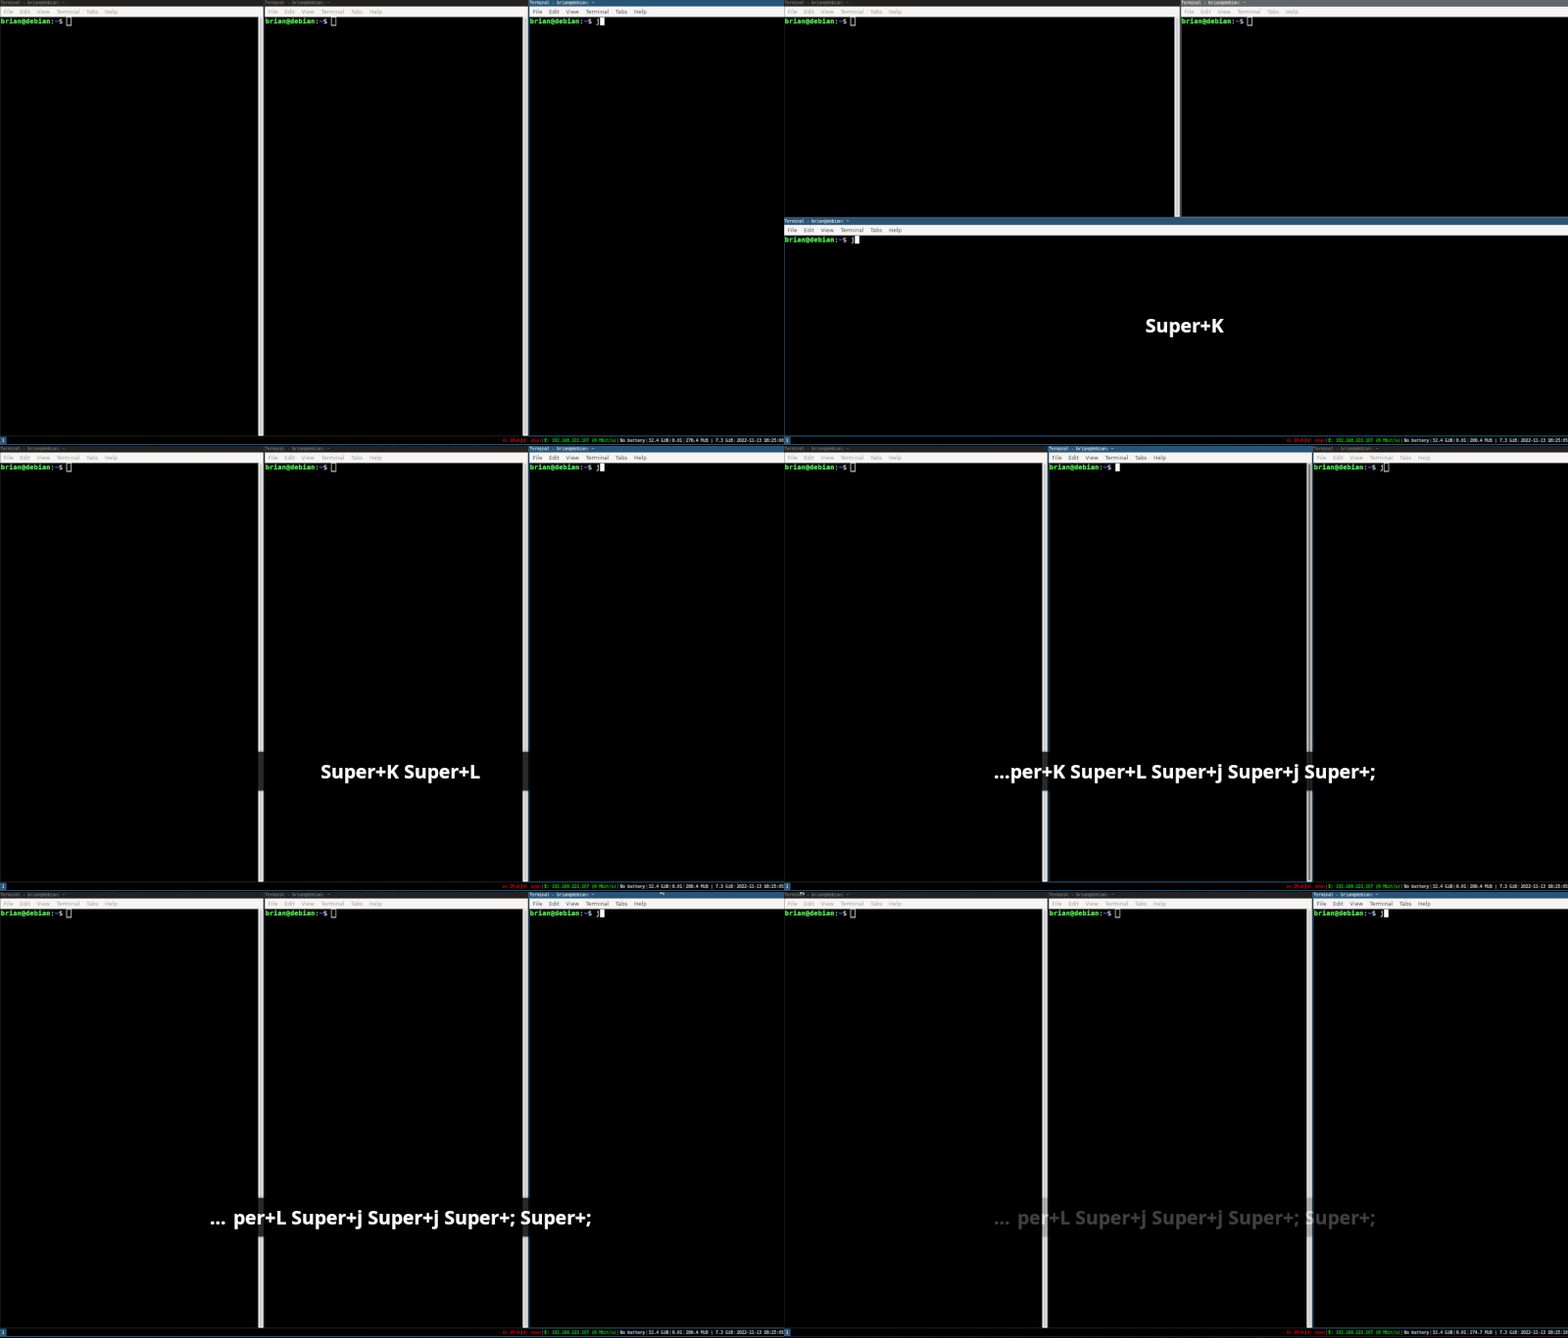
Already you can see the elegant simplicity this kind of workflow enforces. Utilizing some simple keybindings, one can navigate from one window to the next, all the while entering commands into a terminal, text into a text editor, and search queries into a browser.
I won't be going into any kind of extensive coverage of customizing your i3 environment, suffice it to say that Tiling Window Managers in general are highly customizable. Instead, I will refer you to the excellent i3 documentation.
As an aside, you may have noticed I also had you install dmenu and feh alongside i3 and its status bar. This is because the default configuration of i3 has a built in call to dmenu (super+d). This application is an excellent piece of software that, like the terminal, can call any application simply by entering its name into its prompt. I recommend playing around with it and checking out The Arch Wiki's documentation on dmenu. The image viewer, feh, has a nice feature of being able to set the background wallpaper to whatever image you'd like when i3 starts. In your ~/.config/i3/config file, simply enter on its own line the following command:
#bash shell
[~]$ exec feh --bg-fill /path/to/your/preferred_image.png
If you'd like to restart i3 without having to log out, simply enter super+shift+r (if you make any adjustments to your i3 configuration file, you won't see the changes implemented until you reload i3 using this command or you log out of i3).
To log out of i3, enter super+shift+e. This will bring up a yellow message at the top of your screen asking if you'd like to exit i3, click 'Yes,' and it will return you to the login screen.
Conclusion
There is so much more I could cover regarding Tiling Window Managers and the keyboard-centric workflow, but I will leave you with this basic introduction on how to get started with creating your own version of it. While a classic Desktop Environment is fine for most, and will probably always be more popular than Tiling Window Managers, for those of you that have an affinity towards working on the keyboard (which, if you are invested in becoming more productive on the computer, you should), a Tiling Window Manager might be something worthwhile for you to investigate. Below I provide you with a short clip of my standard workflow (if you're wondering how to get transparency to work in the terminal like in this gif, you'll want to look into The Arch Wiki's documentation on picom). To further emphasize the use of the keyboard, I have installed the Vimium extension into the Librewolf browser to demonstrate further the possibilities of working almost completely without a mouse. Enjoy, and keep keybinding.
