Introduction
Whether working in data science, software/web development, or even if one is just a modern power user of computers in general, one is probably at least somewhat familiar with the Git version control system, or at least with the now infamous hosting service, Github.
As a beginning software/web developer, I often find myself overwhelmed by the sheer vastness of the amount of tools available, and the intrinsically complicated ecosystem in which modern software development takes place. There are few pieces of software on which there is a ubiquitous standard in place like there is with Git. In this article, I will attempt to introduce the Git version control system and its most basic features. The intended audience of this article is a complete beginner to Git. Thusly, this article will not cover some of Git's more in-depth features, but please take a look at the provided links for more documentation at the end.
A Brief History of Git
In looking over my previous article covering Why Use Linux, I now realize I never referenced the history of Linux and its creator, Linus Torvalds. This was probably due to the extensive history of Linux, and I didn't wish for that article to turn into more of a history lesson than a beginner's installation tutorial. While it is not my intention to do so with this article either, I feel that Git's history is far more easy to cover, as it is a more recently developed piece of software and has a far shorter timeline to cover.
Git was originally developed by Linus Torvalds in 2005. Torvalds, as I mentioned earlier, is the creator and current maintainer of the Linux Kernel. Linux in its initial days of distribution, was passed around by software enthusiasts using floppy disks and later on CD-ROMs. Updates to the Linux Kernel in the early days were distributed via email mailing lists. The emails included files known as "patches", which provided the differing lines of code which were either added, removed, or altered from the pre-existing code base. While some form of version control had been a part of software development since the early 1960s, concurrent version systems would become the standard for decades starting in 1975, which would later be overtaken by Apache's Subversion system, and finally in the late 1990s, distributed revision control systems would come to dominate the preferred versioning control system by the majority of software developers.
BitKeeper was the first of these distributed version control systems, and was a boon to the Linux Kernel development team, who adopted a beta version of Bitkeeper in 1999. There was some controversy surrounding the use of BitKeeper, which at the time was a piece of proprietary software, and many within the Linux community felt that this was in conflict with the principles under which Linux was founded. In April of 2005, BitMover (owner of BitKeeper) announced that it would stop providing a free version of their software to the community. Linus Torvalds then decided to take a couple of weeks off from development on the Linux Kernel to create a new distributed version control system which he later called "Git", named after the British slang for a "stupid person."
Although originally not intended to be a full-blown version control system, Git eventually became more than just a simple handful of scripts, and is now utilized by the majority of software developers today.
What Is Version Control?
To those uninitiated into the ecosystem of modern software development, version control is pretty much what it sounds like. You have a piece of software you have written, and you have posted it up online for all to enjoy (because you released it under an open source license, right?). Eventually someone uses it and discovers a bug, or has a feature request, or simply wants to take your project and make their own version of it, but how do you do this quickly and easily?
As I covered in the introduction, in the early days there wasn't a very easy way to do this. You emailed a patch file to an email mailing list, and everyone who utilized your software had to be subscribed to that mailing list and manually patch the files themselves (oftentimes this process was partially automated via makefiles or bash scripts). Thank goodness today we have distributed version control systems like Git that largely make this process incredibly easy by comparison.
Why Version Control is So Important
Let's make our example scenario from before more simple for the sake of explanation. Let's say you write some basic JavaScript code like so:
// hello.js

console.log("hello world!");
You save it to your local machine in a file called 'hello.js'. Eventually you realize the triviality of such a program, and want to extend out its functionality. For the sake of brevity, I'll not write out more code, but let's say you write a series of functions and the total lines of code (LOC) goes from being 1 to 40 lines. You intelligently save your work and also decide to back it up on an external hard drive, and even have a friend back up the current version of your software on their server at their house. Great!
But the ideas keep coming, you keep on coding and adding features, occasionally refactoring the code to be less verbose and more succinct. You're becoming a better developer and the program is starting to look good. Eventually you decide to integrate a large new feature and start to write out a substantial amount of code. Once completed, you save your progress, back it up on your external hard drive as well as at your friend's server. Satisfied with the new feature, you decide to call it a night, and hit the hay.
In the morning you return to your project only to find that this new feature has broken a different part of your program. You accidentally didn't compartmentalize the features, resulting in spaghetti code. It'll take you two days to remove all the code you wrote yesterday, and the chance of introducing a bug during this refactor is high. If only you could just roll back time and go back...to a previous version.
This simple example is but one of the many reasons why version control is so important to software development, and doesn't even include the benefits when working with multiple developers on a single project. So how would this scenario play out had you used Git? Let's take a look on how to do that in the next section.
Getting Started On Github
Again, we write out our basic example code:
// hello.js

console.log("hello world!");
We save our file, 'hello.js,', but this time we decide to use Git to save our progress on Github. I won't be covering how to set up a Github account, but here is a tutorial on how to do so.
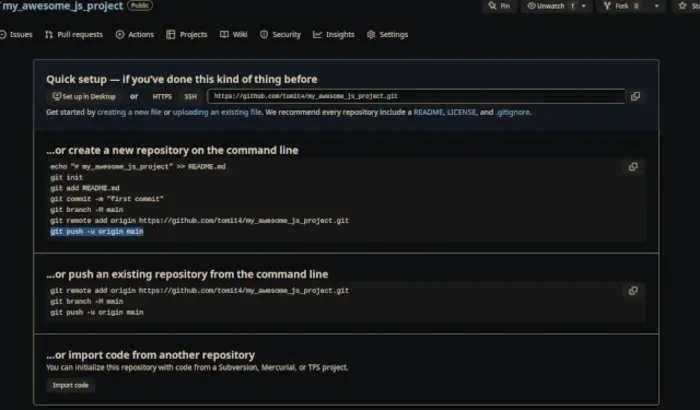
Once you've established a Github account, log into Github, click on the "New" button in the top left-hand corner. Set up a project name called "my_awesome_js_project" and give it a brief description before hitting the "Create Repository" button at the bottom.
After this, you will be presented with a project screen that is a visual representation of your project. This initial screen is pretty bare bones, but provides you with a helpful series of commands to enter into your terminal to start using Git to version control your project.
While you could technically start creating files and pushing them to Github using their GUI interface here in the browser, that was never the intended way of working with Git, which is a command line tool.
So, returning to our initial example, we have a 'hello.js' file, in a project directory under the same name as our project name from before, "my_awesome_js_project". Let's initialize a Git repository inside of this directory by typing into the terminal:
#bash shell
[ ~]$ git init
Great, you should receive a brief message that covers the initialization of your project. If you look around using the "ls" command, however, you'll find that there aren't any new files...or are there? If you then try the "ls" command with the "-a" flag, you'll see that we now have a hidden ".git" directory. You shouldn't need to access this directory as a beginner, but it's good to know it's there in case you do need to make some direct modifications to your Git configuration.
Continuing on, let's add some basic files to our repository. While we do have our "hello.js" file, it's always a good practice to have a README.md file in our repository. Github will present this README to anyone who navigates to your project via Github, and it's generally a good idea to provide some basic documentation about our project to those who take a look at it. Let's create a very basic README.md via the command line per the suggestion on Github like so:
#bash shell
[ ~]$ echo "# my_awesome_js_project" >> README.md
This will create a simple header in a README.md file, which you should now see in your "my_awesome_js_project" directory alongside your "hello.js" file. Now let's use Git to add these files to the repository.
#bash shell
[ ~]$ git add README.md hello.js
Now, we're going to "commit" these files to our repository. You can think of this as a kind of "staging" of our files.
#bash shell
[ ~]$ git commit -m "first commit"
Technically at this point, the next suggested command is optional, but it is very good practice to change branches. A brief explanation of what branches are is necessary to the uninitiated here. One of the most powerful aspects of Git and other versioning systems is its ability to keep track of multiple "branches" of your project. Much as the name implies, you can think of branches as divergences along a tree of versions of your project. Remember in our initial example that you added an extensive feature that once written broke the rest of the program? Well that is a good example of when a separate branch would have been helpful, as once you were done working on that branch of the project, it would not have been part of the "main" or "master" branch of the project. You can think of the "main" branch as being the trunk of a tree, the major body of representation of your project. When adding a new feature, fixing a bug, or doing any sort of work where you don't wish to change the current code base, it's always a good idea to start a new branch.
Whenever a new git repository is initialized, it defaults to a branch known as "master". This branch, in practice, should never be touched except by the project maintainer, who will "merge" the project branches first into a development branch commonly known as "main." Upon completion of certain versions, the project maintainer will merge these changes into the "master" branch. This is why Github's documentation instructs us to create a main branch like so:
#bash shell
[ ~]$ git branch -M main
Finally, we'll configure Git to send our changes to our Github repository using the following command:
#bash shell
[ ~]$ git remote add origin https://github.com/'your_name'/my_awesome_js_project.git
This saves your remote Github repository in the .git directory's config file allowing you to quickly send your changes to Github. Let's send it off to Github now:
#bash shell
[ ~]$ git push -u origin main
You'll be asked to enter your login credentials. Github no longer uses passwords and instead requires use of either a Personal Access Token (PAT) or an SSH key to make changes to your repository. The set up for these are well documented, but can be somewhat intimidating for a new user. While I recommend setting up an SSH key, you can also set up a PAT for this purpose as well.
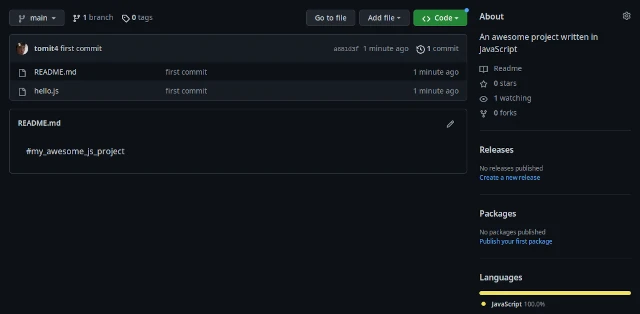
Once you've entered your credentials, a short message letting you know of your successful push to your repository will display in your terminal emulator. Refresh the repository page on Github and you'll see that your project is now up and running.
Basic Git Usage
Excellent, you have successfully instantiated your first Github repository. Now, on the surface, this can appear just like a glorified backup system, and while Git can be used for backups, the main feature of using Git is for version control. Let's add some code to our "hello.js" file to demonstrate. Open up the "hello.js" file in your favorite text editor and add the following line after our initial console.log call:
// hello.js

console.log("hello world!");
console.log("this is my second line of code to commit");
Any good piece of version control software will immediately recognize this change to your code. You can confirm this by running a status check via Git:
#bash shell
[ ~]$ git status
Upon entering this command, Git will now provide you with a brief summary of the changes to your project. In this case we have "modified hello.js". We have yet to have added our changed files, committed our changes with a brief message about what we did, and pushed our changes up to our repository, so let's do all of that now:
#bash shell
[ ~]$ git add hello.js
Note that we are only adding the files we've changed. We never touched the README.md and thusly do not have to add that to our commit. Next let's write a helpful commit message:
#bash shell
[ ~]$ git commit -m "Added a second line as an example"
Here, I'd like to provide a brief word on best practices regarding commit messages. A good commit message should be a short, concise pieces of documentation that informs others working on the project (or just your future self) of what changes were made. These messages should be descriptive enough to cover a specific change that was made, without being overly verbose (less than 50 characters is a good rule of thumb when writing commit messages).
Finally, let's push our changes up to Github:
#bash shell
[ ~]$ git push
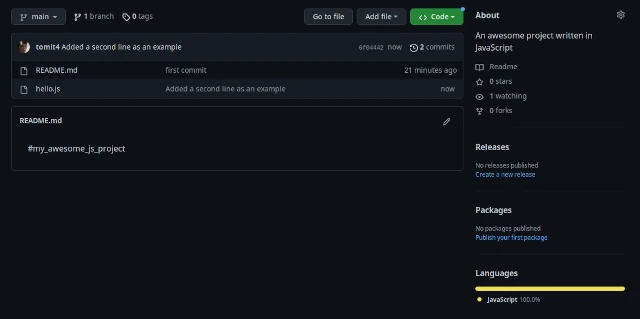
Note that you no longer have to provide the remote name, nor the branch name here. Github will once again prompt you for your credentials (either SSH key or PAT). Once entered, you will get a confirmation message in your terminal emulator, and can visit your Github repository to see the changes online:
As you can see, our update is reflected next to our hello.js file on our repository page. At this point, you will have a very basic understanding about how to use Git. Now I'll cover some other useful aspects.
Git Log And Reverting Back
You can see changes pushed to your Git repository locally by invoking Git's built in log:
#bash shell
[ ~]$ git log
Invoking git log will show you the history of the project for every commit you make. This output is useful should you wish to revert back to one of your previous commits, or simply wish to review the history of a project. Since you only currently have two commits, let's cover how to simply revert back by one commit using the information presented here at git log.
Next to each commit you'll see a long series of letters and numbers. This is a unique identifier for that particular commit. Copy this unique identifier for your initial commit using your mouse to highlight the identifier, and invoking "CTRL + SHIFT + C". This will save the identifier to your clipboard.
Now enter into the command line:
#bash shell
[ ~]$ git reset --hard 'unique-identifier-goes-here'
Keep in mind that this will only change your local repository, and nothing will have changed on your remote over at Github. If you wish to revert the remote repository as well, you can do so by using git push with the -f or --force option:
#bash shell
[ ~]$ git push --force
Keep in mind that using --force is considered to be somewhat overbearing, and you should always heavily consider the ramifications of using this option on a collaborative project, as you can accidentally overwrite another contributor's code. This is why when working on non-trivial projects it is always a good idea to create a different branch.
Conclusion
Whatever your preferences regarding text editors, desktop environments, or operating systems, using Git as a version control system is an essential skill for the modern day software developer. Even though there are other version control systems out there, Git has become ubiquitous with version control. It is essential that if you are just starting out with software development that you become familiar with Git and its many features, as they will inevitably become a part of your daily workflow.
As an aside, there are far more features of Git than what is covered here in this article, so please see the official documentation for more information. Additionally, there are many pieces of software that make working with Git less cumbersome than what is available at the standard command line. Some of these projects include lazygit, Github's offical CLI tool, and for those of you who use Vim, there is Vim-Fugitive.
I would be remiss not to mention my own CLI tool that I wrote in bash, called bgit. While not nearly as fully featured as the aforementioned software, it is a very basic wrapper around Git that automates away some of the commands covered in this article. I wrote this script as a way to teach myself a little more about Git and bash, and it is certainly not without its flaws, but take a look if you're interested.
Lastly, I'll encourage you to first become familiar with the basics of Git before going to one of these other pieces of software, as understanding how Git works from the ground up is essential before moving on to utilizing these other tools. I wish you well in your journey towards better software development and I hope I have helped you understand a little bit more about this essential piece of software.
