Introduction
Documentation in the world of software is an essential part of the development process. Without proper documentation both users and developers are given the monumental task of parsing out a project line by line in order to understand how to debug the project, contribute to the project, or indeed, even utilize the software itself.
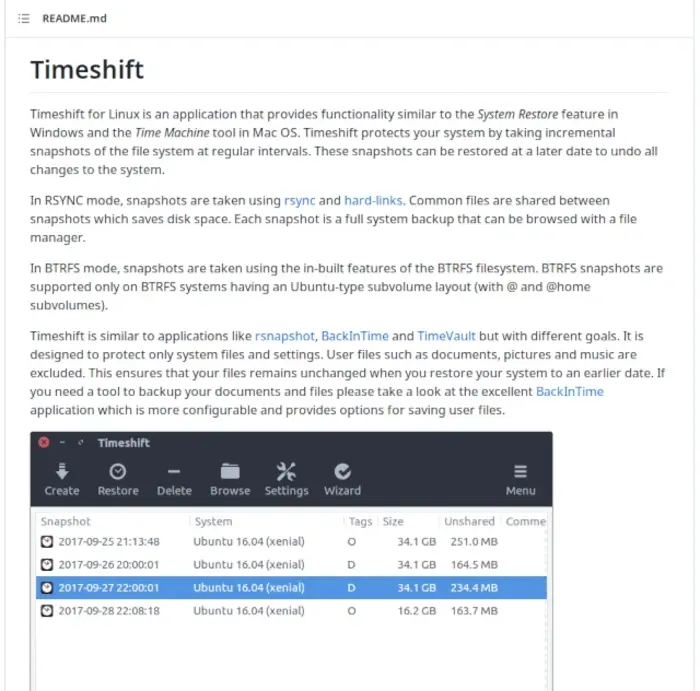
There are many forms of documenting projects, be they man pages accessible via the terminal to official documentation provided by the developer hosted on their website. One essential type of documentation that a new software developer must become familiar with is the README.md file. If you have ever perused a properly maintained repository on Github or other hosting service websites, you have most certainly come across a README.md. The finished document looks something like this:
The Basic Readme
The README is a document that one can think of as being the entry point to learning about and using a piece of software. Oftentimes this document provides instructions on installation, basic usage, and configuration. Sometimes multiple READMEs are provided on more extensive projects to help developers extend, debug, and manage a piece of software.
Not including a README, even when working on a trivial or basic project, is considered poor etiquette, as having no README leaves any potential user or developer with absolutely no information about what lies within the project, and indicates that the project maintainer doesn't care about the project, or at least, doesn't care to provide documentation. Very simply, it is always a good idea to provide at least a basic README when creating a project.
Although a README can be written in plain text or even HTML, the markdown language has become the standard for writing READMEs, as it provides a quick way to create formatted text that is well presented to the reader. READMEs are traditionally capitalized so that the 'ls' command prioritizes its display, and the .md appended to the end of the README indicative that the document is written in markdown.
The Markdown Language
Anyone familiar with The HyperText Markup Language, commonly known as HTML, will find themselves comfortable working in Markdown, as many pieces of Markdown are interchangeable with classic HTML elements, just expressed differently.
In certain circumstances, the Markdown language is even more powerful than HTML, as it can very quickly represent tables, graphs, checkboxes, and other common presentation elements in a way that is easier to read and requires fewer typed characters to express them.
For the remainder of this blog post, I will cover how to create a standard README for a software project. While Markdown has many extensive features such as presentation graphs and tables, I will solely be covering the basics for the sake of brevity and this is only meant as an introduction. Should you desire to explore what other features the Markdown language has to offer, I advise you to take a look at the official guide.
Getting Started
At the end of the day, Markdown is simply an extension upon a plain text document, so one can get started working in it right away. Navigate to the base of a project you'd like to write a README for (or just create a test directory), and let's create one from the command line using the touch command:
#bash shell
[~]$ touch README.md
Next we'll open up our newly created README.md file in our favorite text editor and start documenting our project. I'll be using NeoVim for my examples, and will also be using an extension called markdown-preview. If you are reading this blog post and want to follow along in VS Code, there is equivalent functionality available for that editor as well in the form of different extensions.
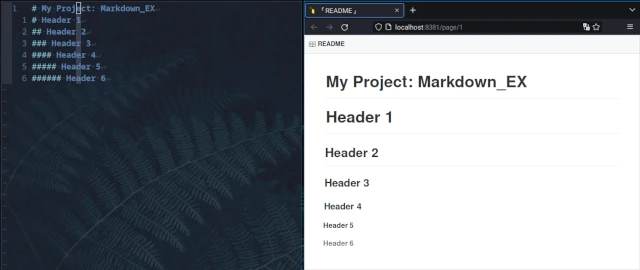
Let's write out a header, with the title of our project. I'm going to call my project, "markdown_ex".
As you can see, a single hashtag "#" character is interpreted by Markdown as indicating the beginning of a header. This is equivalent to an h1 tag in HTML. Let's create some other headers as an example.
Now, what's nice about Markdown is at this point you can simply start typing out your documentation. Unlike in HTML, there is no need to encapsulate everything in paragraph tags, so working in Markdown becomes more akin to working in an extremely basic word processor. You can revert to using HTML elements if you'd like, but especially in this mentioned example, it is not necessary:
Stylizing Text
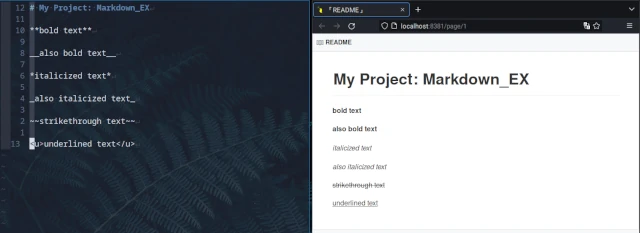
Let's now explore some of the basic features that Markdown has to offer. Let's say we wish to stylize our text a little beyond just making headers. Well, we have many options at our disposal. Let's create some bold, italic, underline, and strike-through pieces of text:
Here we see the various syntax utilized for styling pieces of text in markdown. I'll cover briefly the basic syntax here:
<!-- README.md -->

**two stars creates bold text**
__two underscores also creates bold text__

*single star creates italicized text*
_single underscore also creates italicized text_

~~two tildes creates strikethrough text~~
<u>html style u tags creates underline text</u>
Creating Lists
As I mentioned earlier, the syntax of Markdown can be far nicer than HTML in many respects. A good example of this is creating ordered and unordered lists. In HTML, creating an unordered list looks like this:
<!-- index.html -->

<u>
    <li>My first item</li>
    <li>My second item</li>
    <li>My third item</li>
</u>
As opposed to in Markdown:
<!-- README.md -->

 - My first item
 - My second item
 - My third item
The following picture demonstrates the simple creation of ordered and unordered lists in markdown:
Creating Links
Markdown is especially easy on the eyes when it comes to creating links. In HTML, creating a basic link can be created like so:
<!-- index.html -->
<a href="https://www.example.com">my example link</a>
The same can be accomplished in Markdown like so:
<!-- README.md -->
[my example link](https://www.example.com)
Code Snippets
The Markdown language is multifaceted, it can be utilized to document anything from scientific papers to simple blog posts and is often utilized in online forums. One of the most common usage for Markdown is code snippets, which can be expressed using backticks like so:
<!-- README.md -->
```console.log('nice code block!')```
Or Like so:
<!-- README.md -->
`console.log('nice code block!')`
If, for example, you needed to present some basic JSON, you could do so very simply like so:
<!-- README.md -->

``
{
    "firstName": "John",
    "lastName": "Smith",
    "age": 25
}
``
The following picture demonstrates the effect:
Checkboxes
One of my personal favorite uses of Markdown is to place a list of checkboxes towards the bottom of my READMEs. This usually is a list of various aspects of my software that need to be worked on, such as new features, bug fixes, and documentation.
Checkboxes can be instantiated like so, one is checked off, the other is not:
<!-- README.md -->

 - [x] This is a completed task
 - [ ] This task has yet to be done
And here is an example Picture showing the results:
Conclusion
The capabilities of Markdown are vast. In addition to what has been covered here, one can create tables, graphs, and embed images/GIFs into Markdown files to further help document your projects.
A good README can often be the saving grace of a project. Even if a project is poorly designed or not well maintained, a good README can provide a general overview of a piece of software and help others navigate its use, configuration, and further development. Without a README, the potential user or developer is left solely with the code itself to determine everything about the project. Indeed, a project without a README is probably not worth investigating, unless the codebase is particularly small and even then, some form of introductory documentation would be highly encouraged.
As a beginning software developer, the README is one of your most important resources when learning about a new tool, or even referring back to one of your old projects. It is within your best interest to develop a good habit of writing READMEs and other forms of documentation for your projects, so take the time to familiarize yourself with one of the most common forms of it, Markdown.
I do hope this has been helpful to you and provides you with a basic understanding of the Markdown language and how to utilize it for a basic README. Cheers and Happy Coding!
