Introduction
In our previous three articles on HTML, CSS, and JavaScript, I provided you with a general overview of the three main languages utilized to interface with modern web browsers. In reading these articles, however, you may have noticed that how these three languages interface directly with each other may not be obvious. This is especially true of the article on JavaScript, as there was no manipulation of the Document Object Model using JavaScript.
As mentioned in my previous article, JavaScript is a vast subject in its own right. It is my hope that through this series of blog posts that you gain a good introductory understanding of how web pages and web applications come to life. Because JavaScript is a full-fledged programming language, the basic aspects of programming needed to be addressed before diving into how it interfaces directly with the Browser's Application Interface (i.e. API).
The To Do List
In preparation for this article, I created a small To Do List Application. Beginner programmers, regardless of the programming language they are learning, are often encouraged to start with building a To Do List Application. The reason for this is because the essential concepts learned while building such an application are easily applied to the majority of real world applications. Specifically, building a To Do List Application teaches you about the basic operations commonly found in many applications. These operations are "Create", "Read", "Update", and "Delete", abbreviated as the acronym, "CRUD".
These correspond roughly to the standard HTTP operations, which will be the subject of a future blog post where this To Do List application is expanded out of just the browser, and is hooked up to a backend server and database. For now, however, this application will be kept on the front end in order to introduce you to how JavaScript specifically interacts with the DOM.
Be aware that this blog article/tutorial assumes you have an introductory understanding of HTML, CSS, and JavaScript. Should you need to brush up on the basics, I encourage you to read up on these subjects in my previous three blog posts. Here, we will dive deeper, introducing many new aspects of HTML, CSS, and JavaScript. Let's get started.
The Setup
Getting up and running for this tutorial should be relatively straight forward if you've read my previous articles. First, you'll need to make a directory in which your To Do Application will live. Go ahead and, from the command line, create a new directory called "app_todo" and navigate into it:
#bash

[ ~]$ mkdir app_todo && cd app_todo
From here you'll want to make three files, index.html, styles.css, and script.js:
#bash

[ ~]$ touch index.html styles.css script.js
Now open up index.html in your text editor of choice and enter the following:
<!DOCTYPE html>
<html lang="en">
  <head>
    <title>App ToDo</title>
    <meta charset="UTF-8" />
    <meta name="viewport" content="width=device-width, initial-scale=1" />
    <meta name="description" content="A Basic ToDo Application" />
    <link type="text/css" href="./styles.css" rel="stylesheet" />
  </head>
  <body>
    <main>
      <h1>App ToDo</h1>
    </main>
  </body>
  <script type="text/javascript" src="./script.js" default defer></script>
</html>
As you can see, we are sourcing our styles.css and script.js files directly within our HTML. Let's now set up some sane defaults in our styles.css file:
/*styles.css*/

*,
*::before,
*::after {
  box-sizing: border-box;
}

html {
  color-scheme: light dark;
}

body {
  font-family: system-ui;
  font-size: 1.125rem;
  line-height: 1.5;
}

main {
  width: min(70ch, 100% - 4rem);
  margin-inline: auto;
}

img,
svg,
video {
  max-width: 100%;
  display: block;
}

input,
textarea {
  min-width: 0;
}
Great! Now that we have that set up, let's lastly just put a simple log to the console in our script.js file to test that we set everything up properly:
//script.js

console.log("Hello World!");
Once you've finished, go ahead and use live-server (either from the command line or from within VSCode using the the extension) to start your development server. I personally use the command line to do so from within my project directory like so:
#bash

[ ~l$ live-server .
This should automatically open up your browser on your localhost and show you the basic webpage you've just created with these three files. Open up your devtools as well once the browser is open by hitting the F12 key. If all is configured properly, you should see your HTML page with some very basic CSS stylings (from the styles.css file) and in your developer's console page, you should see the "Hello World!" message (from the scripts.js file). Your browser/devtools setup should look something like this: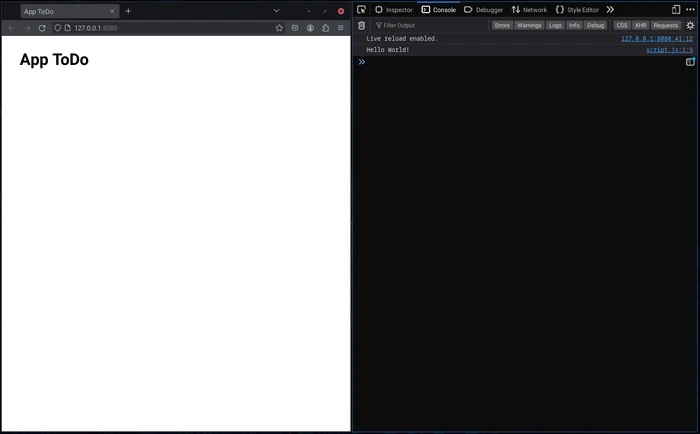
Looks Good! Let's now start by centering our h1 tag within a div tag with the class of form-container:
  <body>
    <main>
      <div class="form-container">
        <h1>App ToDo</h1>
      </div>
    </main>
  </body>
Adding "container" divs and spans to encapsulate other HTML elements is a common practice to apply styles to all elements within said container or, as you'll see below, directly to specific elements within that container. Let's now adjust our CSS to center our form-container div, and the h1 tag within it.
/*styles.css*/

input,
textrea {
  min-width: 0;
}

.form-container {
  display: flex;
  flex-direction: column;
  justify-content: center;
  align-items: center;
}

.form-container > h1 {
  margin: 1em auto -0.0125em auto;
  text-align: center;
}
Now if we look at our updated HTML in our browser, we should see that our header "App ToDo" is indeed centered:
h1 Tag Centered
In the interest of keeping this article concise, and to focus mainly on the JavaScript logic that we will implement, I'll not spend time on documenting the CSS aspects of this project. Please feel free to take a look at MDN's article on Centering An Element should you be curious on how the above CSS works.
In order to create a series of todos, we'll need a way for the user to enter a todo, adding it to a list, with the result being that it renders nicely on our page. Let's first establish a form with an input field as well as a submit button for them to utilize and to create a todo item:
HTML Forms
Forms in HTML are one of the few ways we can grab specific data from the user of our application. There is much to discuss when it comes to HTML forms and the various aspects to how to properly implement them in web applications, but as this is an introductory article, I'll forego most of that for now and simply dive into the basics. Here is how we can establish a basic HTML form below our h1 tag:
  <body>
    <main>
      <div class="form-container">
        <h1>App ToDo</h1>
        <form id="todo-form-container">
          <label class="todo-label" for="todo-input">Enter A Todo:</label>
          <input
            type="text"
            name="todo-form"
            placeholder="Todo Item"
            minlength="1"
            maxlength="18"
            class="todo-input"
            id="todo-input"
          />
        </form>
        <input type="submit" value="Add Todo" class="todo-button" id="add-todo-btn" />
      </div>
    </main>
  </body>
There is a lot going on even in this simple form. The label tag provides us, the developer, with an easy way to establish a connection between our input tag using the for attribute. By inputting "todo-input" in the label's for attribute, as well as in the input's id attribute, we are creating an implicit relationship between the two HTML elements.
The other attributes present within the input tag are somewhat self explanatory, but if you wish to explore further, I recommend taking a look at MDN's article on the form element.
At this point, our HTML form should render via live-server in our web browser like so: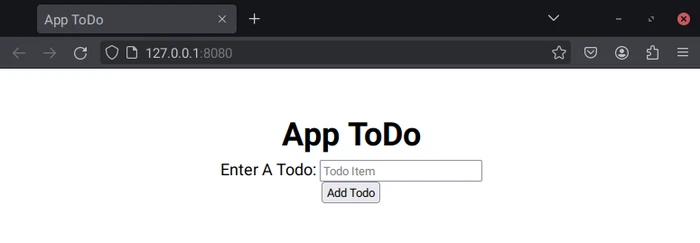
Let's take a moment to return to our CSS to style our form a bit, give each element a bit of breathing room, and center these elements as well. Here is the relevant CSS:
/*styles.css*/

.form-container > h1 {
  margin: 1em auto -0.0125em auto;
  text-align: center;
}

.todo-label,
.todo-input,
.todo-button {
  display: flex;
  justify-content: center;
  align-items: center;
  flex-direction: column;
  margin: 1em auto 0.5em auto;
  font-weight: 500;
}

.todo-input {
  padding: 0.25em;
  font-size: 1em;
  text-align: center;
  line-height: 1.5;
  border: 2px solid #000;
  border-radius: 5px;
  width: 20px;
  max-width: 80vw;
}

.todo-button {
  padding: 0.25em 0.5em;
  font-size: 0.9em;
  line-height: 1.5;
  background-color: #fff;
}

.todo-button:hover {
  scale: 1.1;
}
This CSS should now center our form, if we return to view our HTML in the browser, this should be reflected like so: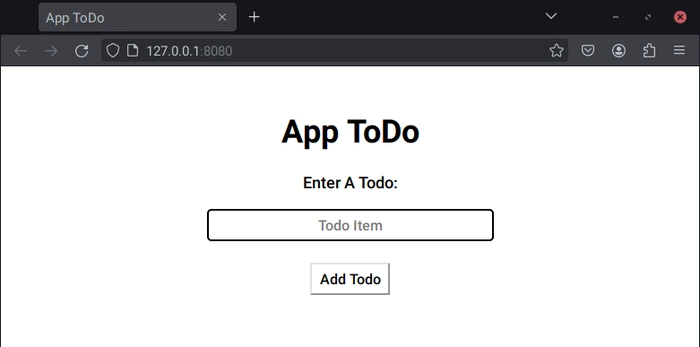
Let's now hook up our form to JavaScript events. We'll be starting small, simply making sure our interactions with our forms are "seen" by our JavaScript file. Remove our console.log("Hello World!"); from our script.js file and replace it with this:
//script.js

console.log("Hello World!"); // Delete this line

const todoForm = document.getElementById("todo-form-container");
const todoBtn = document.getElementById("add-todo-btn");
const todoInput = document.getElementById("todo-input");


function handleSubmit(event) {
  event.preventDefault();
  console.log("handleSubmit function invoked!");
}

function main() {
  todoForm.addEventListener("submit", handleSubmit);
  todoBtn.addEventListener("click", handleSubmit);
}

main();
Before explaining the above code, let's first test it in our browser to ensure it's working as expected. After inputting this code into our script.js file, we can return to our HTML page in the browser and interact with the form by typing in some text and hitting the Enter key. We also can click on our Add Todo button. Once either event is fired by our interaction with the webpage, the text "handleSubmit function invoked!" should be logged to the developer console.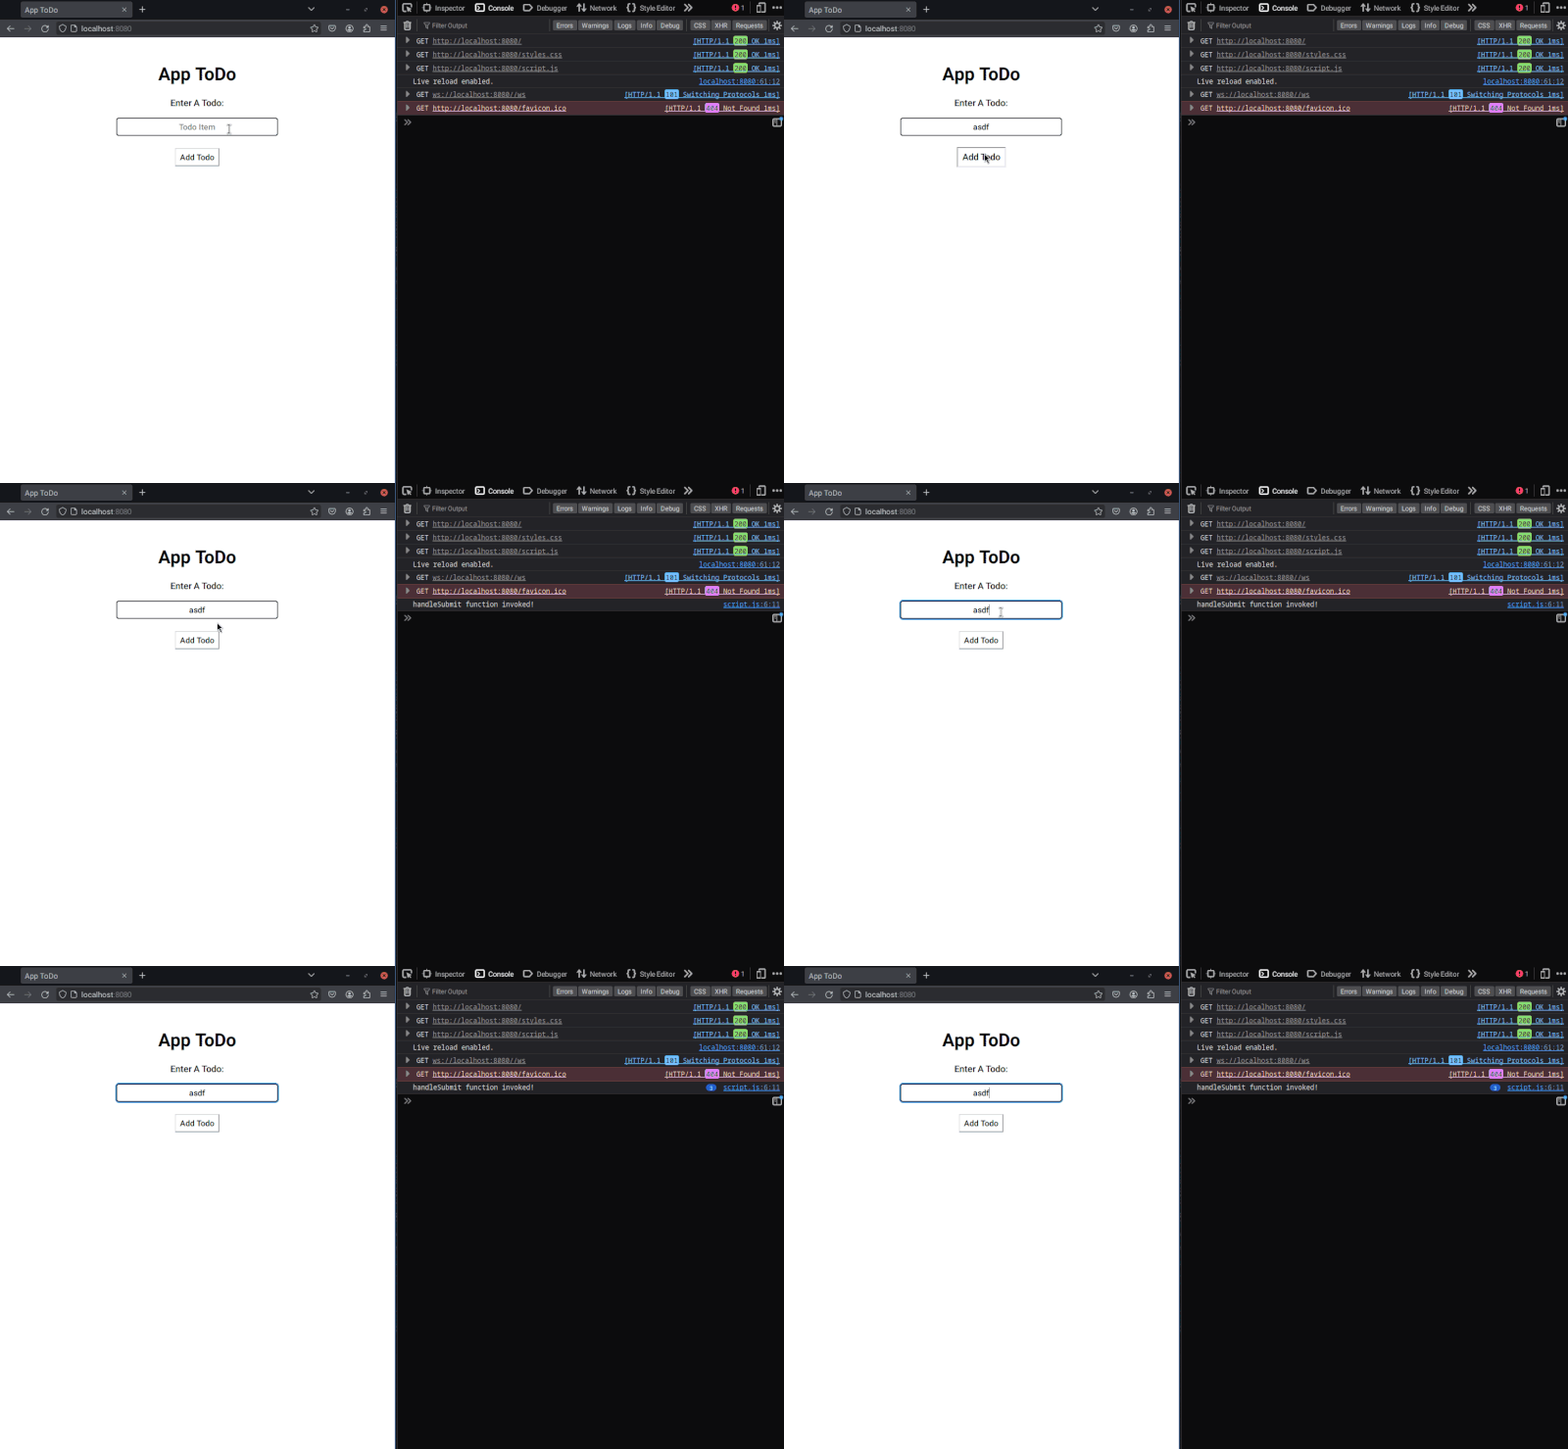
This is the first time in our tutorial series on these tools that I have now demonstrated how JavaScript is interacting with the Document Object Model (the DOM). In our JavaScript above, when we declare the variable todoForm like so:
//script.js

const todoForm = document.getElementById("todo-form-container");
We are instantiating a reference to the HTML element that we assigned to an id called todo-form-container. This refers specifically to this piece of HTML code:
<form id="todo-form-container">
  <label class="todo-label" for="todo-input">Enter A Todo:</label>
  <input
    type="text"
    name="todo-form"
    placeholder="Todo Item"
    minlength="1"
    maxlength="18"
    class="todo-input"
    id="todo-input"
  />
</form>
<input type="submit" value="Add Todo" class="todo-button" id="add-todo-btn" />
We also grab references to our add-todo-btn and also our todo-input:
//script.js

const todoForm = document.getElementById("todo-form-container");
const todoBtn = document.getElementById("add-todo-btn");
const todoInput = document.getElementById("todo-input");
In our HTML, we can find references to these ids within the same markup example:
<form id="todo-form-container">
  <label class="todo-label" for="todo-input">Enter A Todo:</label>
  <input
    type="text"
    name="todo-form"
    placeholder="Todo Item"
    minlength="1"
    maxlength="18"
    class="todo-input"
    id="todo-input"
  />
</form>
<input type="submit" value="Add Todo" class="todo-button" id="add-todo-btn" />
We then establish a main function. This is a common convention in not just JavaScript, but in many programming paradigms, where a final main routine is established and, in some cases, invoked (as is seen on the last line of the script.js file). Usually the main function calls other "helper" functions within the file. While technically these invocations could occur in the global namespace of our program, it is a common convention and good practice to encapsulate our JavaScript in this fashion as it limits the declaration of global variables and is more readable overall.
Currently within our main functin, we grab our todoForm and todoBtn variables. Again, these are pulled from our references to the Document Object Model. These references themselves have various properties and methods that we can reference in order to program interactivity with our HTML elements. Inputs like the one we have created of type "text" have a "submit" event that we can "listen" to and initialize scripted events to occur. Similarly, our input of type "text" has a "click" event that we can hook into and "listen" for. Hence our main function invokes two "addEventListener" calls like so:
//script.js

function main() {
  todoForm.addEventListener("submit", handleSubmit);
  todoBtn.addEventListener("click", handleSubmit);
}
We then "tell" the DOM to add an "event listener" to our respective HTML input elements and associate that listener with a helper function called handleSubmit. Note that both events fire off the handleSubmit function. We could have fired off separate functions for each, but whether the user hits the "Enter" key or clicks the "Add Todo" button, we want the same result (to register the creation of a new todo item).
The handleSubmit function is then invoked any time that the "submit" or the "click" events occur. In investigating our handleSubmit function, we find that it takes an event argument. This is needed in order to prevent the Browser's native actions from executing when either the "submit" or "click" events occur. While some might find this a bit cumbersome, it is a common practice in front end web development to circumvent the default behavior of these events using the preventDefault method:
//script.js

function handleSubmit(event) {
  event.preventDefault();
  console.log("handleSubmit function invoked!");
}
Lastly we then have our code we wish to invoke whenever the handleSubmit function is called. This, for the time being, is simply to log to the console the phrase "handleSubmit function invoked". We will now implement the logic to add a todo item, and have it render on our HTML page.
Adding Todos
Firstly we'll need to establish a JavaScript array to hold our todo items in memory. Once this is established, we'll then need to populate this array with our todo string whenever we hit the "Enter" button or click the "Add Todo" button. Finally, every time this event occurs, the array is rendered back to the HTML page in the form of an unordered list. Let's first establish the unordered list in our HTML file. Because this list will be blank at first, we'll simply leave it as a ul element for now:
<input type="submit" value="Add Todo" class="todo-button" id="add-todo-btn" />
<ul id="todo-list"></ul>
Let's take a brief moment to stylize our unordered list. Specifically, we'll be targeting any li elements that are created, that way they are somewhat readable when generated and rendered:
/*styles.css*/

.todo-button:hover {
  scale: 1.1;
}

.form-container > #todo-list {
  list-style: none;
  width: 100%;
  max-width: 18em;
  padding: 0;
}

#todo-list > li {
  margin: 0.75em 0;
  padding: 0.25em;
  border-bottom: 2px solid #000;
  font-weight: 500;
}
We'll now create an array called myTodos. For now, this array will live within the global scope of our program, but towards the end of this article, I will point you to a Github repository that will hold a more advanced form of this script for your reference with somewhat better practices involved in its execution. Start a new myTodos array at the top of your script.js file. We'll also instantiate a reference to our todo-list as well:
 //script.js

const todoInput = document.getElementById("todo-input");
const todoList = document.getElementById("todo-list");
const myTodos = [];
Next we'll add the logic that will actually render our todos to the HTML document. Input the following code to the handleSubmit function:
 //script.js

function handleSubmit(event) {
  event.preventDefault();
  todoList.innerHTML = "";
  myTodos.unshift(todoInput.value);
  for (let i = 0; i < myTodos.length; i++) {
    const newTodo = document.createElement("li");
    newTodo.textContent = myTodos[i];
    todoList.appendChild(newTodo);
  }
  todoInput.value = "";
}
For the new developer, this can be a bit confusing. We'll break it down, don't worry, but first let's take a look at our HTML page and test our Todo App first: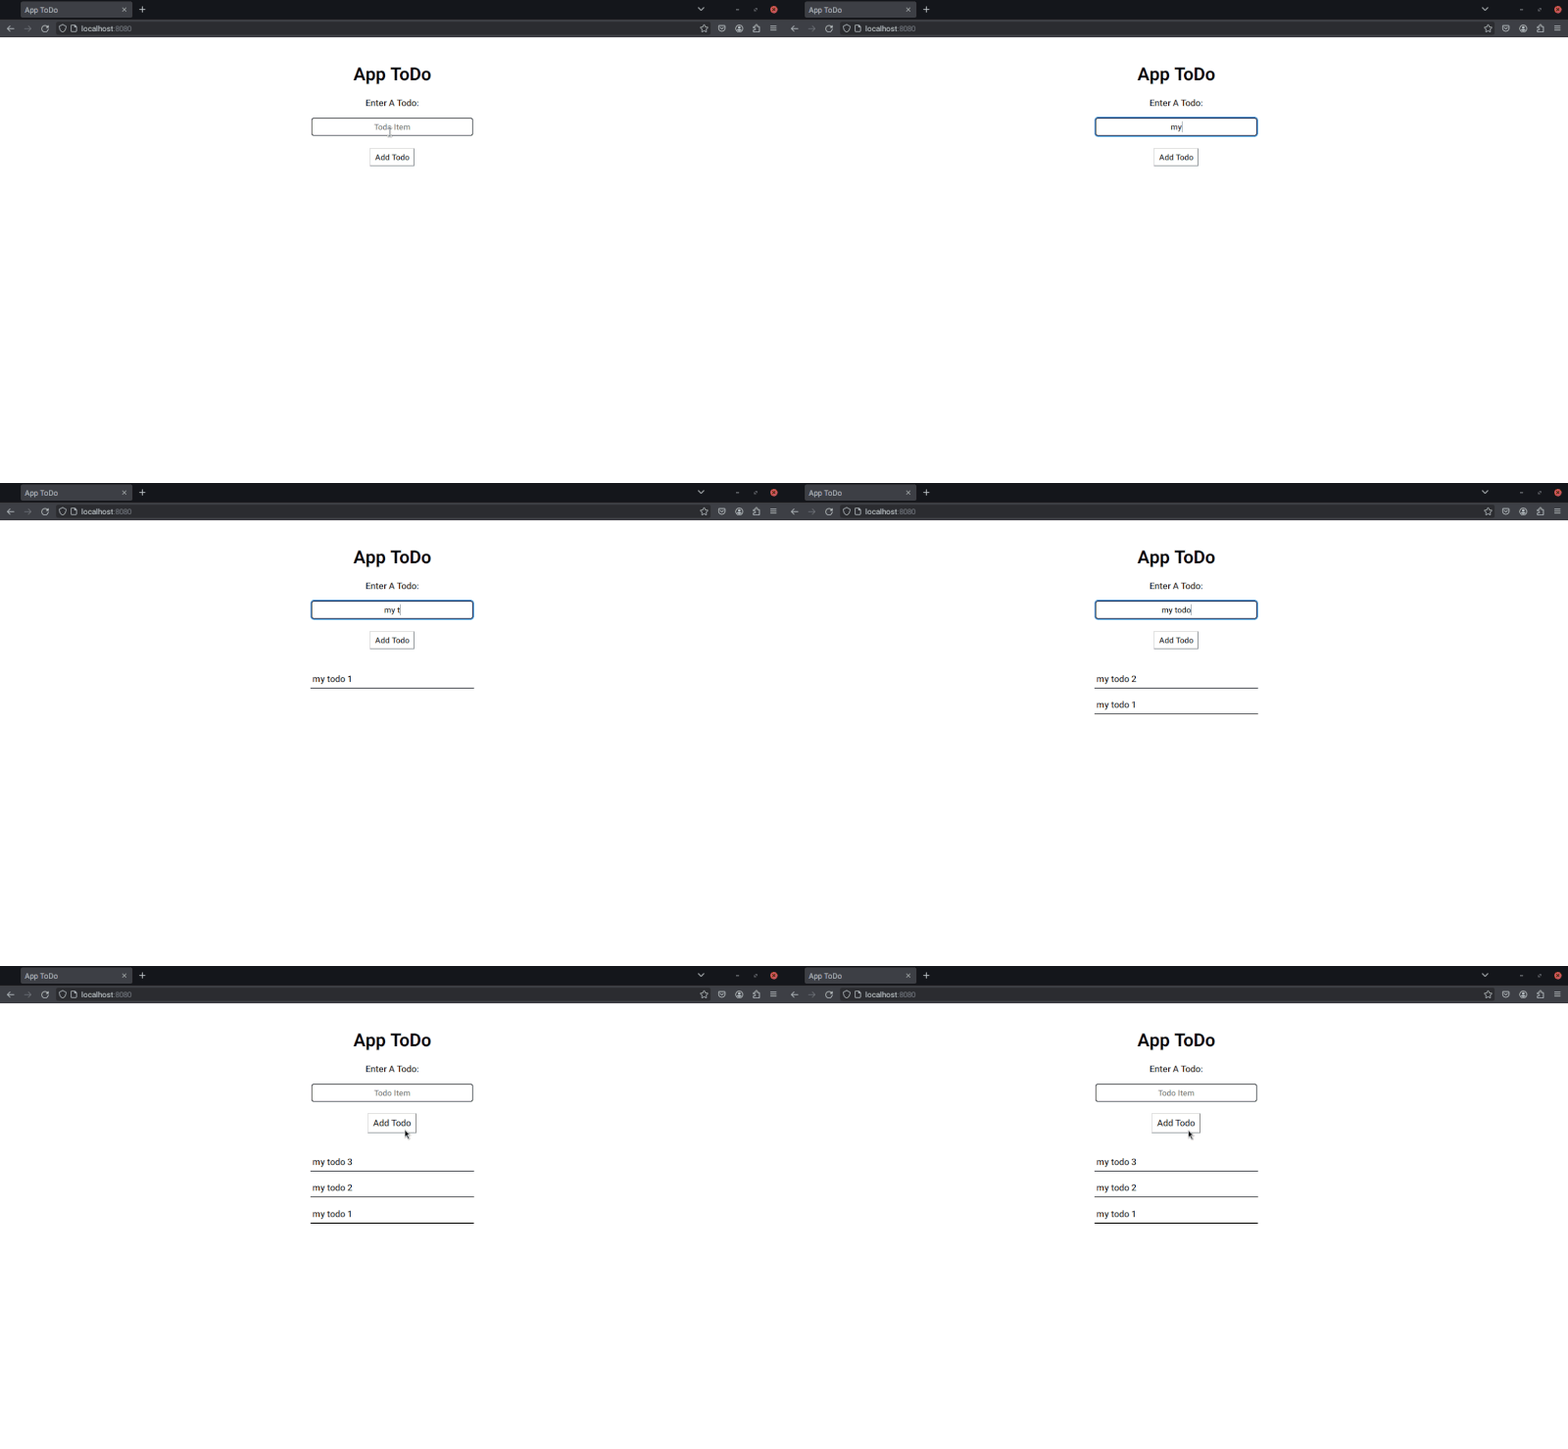
Excellent! Now that we have confirmed everything is working as expected, what exactly did we do? This bit of logic introduces a few new concepts, so let's break it down. The first new line we added to our handleSubmit function shows us accessing our todoList's innerHTML property:
 //script.js

function handleSubmit(event) {
  event.preventDefault();
  todoList.innerHTML = "";
  ...
This is simply clearing out our unordered list, setting it's innerHTML back to being empty. Recall our related HTML code?:
<input type="submit" value="Add Todo" class="todo-button" id="add-todo-btn" />
<ul id="todo-list"></ul>
Our unordered list, todo-list, is initialized as having no elements inside it. There are no <li> elements yet. Whenever we submit a new todo list, if we didn't clear it, it would not only prepend the new todo to the list, but would regenerate our entire code snippet again and print the entire list plus the new item, creating an unncessarily long list of repeated todo items.
Next we prepend our new todo item to the beginning of our myTodos array using the unshift() method:
 //script.js

function handleSubmit(event) {
  event.preventDefault();
  todoList.innerHTML = "";
  mytodos.unshift(todoInput.value);
  ...
The unshift() method is very similar to the push() method covered in our previous article on JavaScript. Instead of appending our new item to the end of the myTodos array however, we prepend our new todo item to the beginning of the myTodos array. Perhaps it is self-explanatory, but in order for us to grab the text content of the input the user has in the input field, we need to reference the todoInput's value property.
Because the myTodos array is instantiated in the global namespace of our program, it holds onto all todos input in memory. It is important to note that if you refresh the page, this memory is cleared and all todos will be lost. There are many ways to get this data to persist between refreshes, including storing our todos in localstorage, cookies, or, in more real world examples, a database. For now, however, we'll keep it simple and have the myTodos array stand in for these.
Returning to our handleSubmit function, we now start a for loop, which iterates over our myTodos aray. For each todo element within our myTodos array, we instantiate a new newTodo variable, calling on the document's createElement() method, and pass it the string "li". As this syntax indicates, we are creating a new list item. In our HTML document, this would be equivalent to creating an empty <li> element:
 //script.js

function handleSubmit(event) {
  event.preventDefault();
  todoList.innerHTML = "";
  mytodos.unshift(todoInput.value);
  for (let i = 0; i < myTodos.length; i++) {
    const newTodo = document.createElement("li");
    ...
We proceed to populate this new <li> element with the text contained within our todo element expressed as myTodos[i]. This is done by defining the value of our newTodo variable's textContent property:
 //script.js

function handleSubmit(event) {
  event.preventDefault();
  todoList.innerHTML = "";
  mytodos.unshift(todoInput.value);
  for (let i = 0; i < myTodos.length; i++) {
    const newTodo = document.createElement("li");
    newTodo.textContent = myTodos[i];
    ...
Finally, we append this new <li> element to our unordered list as a child element. The appendChild() method populates the todoList with text from the myTodos array:
 //script.js

function handleSubmit(event) {
  event.preventDefault();
  todoList.innerHTML = "";
  mytodos.unshift(todoInput.value);
  for (let i = 0; i < myTodos.length; i++) {
    const newTodo = document.createElement("li");
    newTodo.textContent = myTodos[i];
    todoList.appendChild(newTodo);
  }
  ...
Inside our HTML page, this would look like this had we written it out by hand:
 <ul id="todo-list">
  <li>"my todo from input"</li>
 </ul>
To facilitate a better user experience, we also include another line of code that executes once the for loop has completed, which clears the todoInput's value so the user doesn't have to delete the old todo before entering a new one:
 //script.js

function handleSubmit(event) {
  event.preventDefault();
  todoList.innerHTML = "";
  mytodos.unshift(todoInput.value);
  for (let i = 0; i < myTodos.length; i++) {
    const newTodo = document.createElement("li");
    newTodo.textContent = myTodos[i];
    todoList.appendChild(newTodo);
  }
  todoInput.value = "";
}
Conclusion
Admittedly, a true Todo Application is far more fully featured, and perhaps I will write more on this topic further in future articles. As mentioned in the introduction of this article, a true Todo List Application follows what is known as the Create, Read, Update, and Delete paradigm (commonly known as CRUD), in which we, as the developer, would give the user an interface to not only Create and Read todos (which we have done here), but also to Update and Delete them. The goal of this article, however, was to establish exactly how HTML, CSS, and JavaScript all work together to provide a user with an interactive experience.
For your reference, I am providing this repository, which showcases the final code of this todo application, completing the CRUD paradigm. In addition, the final version of this project utilizes the Browser's native localstorage API to persist the todo list between refreshes (although if you delete cookies on closing your browser, then the local storage is cleared, so be mindful of that).
I also added a bit of CSS to the final project, including some icons that were downloaded from Iconify. If you take a look at the styles.css file in the final version of the project, you'll see how this is accomplished.
I do wish I could include the entirety of this project within the context of this article, but as it is already quite lengthy (with this article itself being a continuation of the previous article), I don't wish to burden you with another overly lengthy article on the subject, and instead invite you to take a look at the final project on Github!
As always, I do hope this was helpful! ☮️
